JDK学习--ThreadLocal
JDK学习–ThreadLocal
对于ThreadLocal而言,我想做过后台Java开发的都不会太陌生。对于线程间的隔离,最简单的方法就是采用ThreadLocal的模式。那么,什么是ThreadLocal呢?官网给出的答案是:
ThreadLocal类提供了线程局部 (thread-local) 变量。这些变量与普通变量不同,每个线程都可以通过其 get 或 set方法来访问自己的独立初始化的变量副本。ThreadLocal 实例通常是类中的 private static 字段,它们希望将状态与某一个线程(例如,用户 ID 或事务 ID)相关联。
说白了,ThreadLocal就是为我们的每个线程提供了一个变量。并且这个变量仅仅只能当前线程访问,保证了线程间变量的隔离性,防止出现并发的一种解决方案。
那么接下来,我们来研究一下,为什么ThreadLocal可以做到线程间隔离,并且,它的内部优势如何实现的呢?
原理
首先,我们看下ThreadLocal的UML类图:
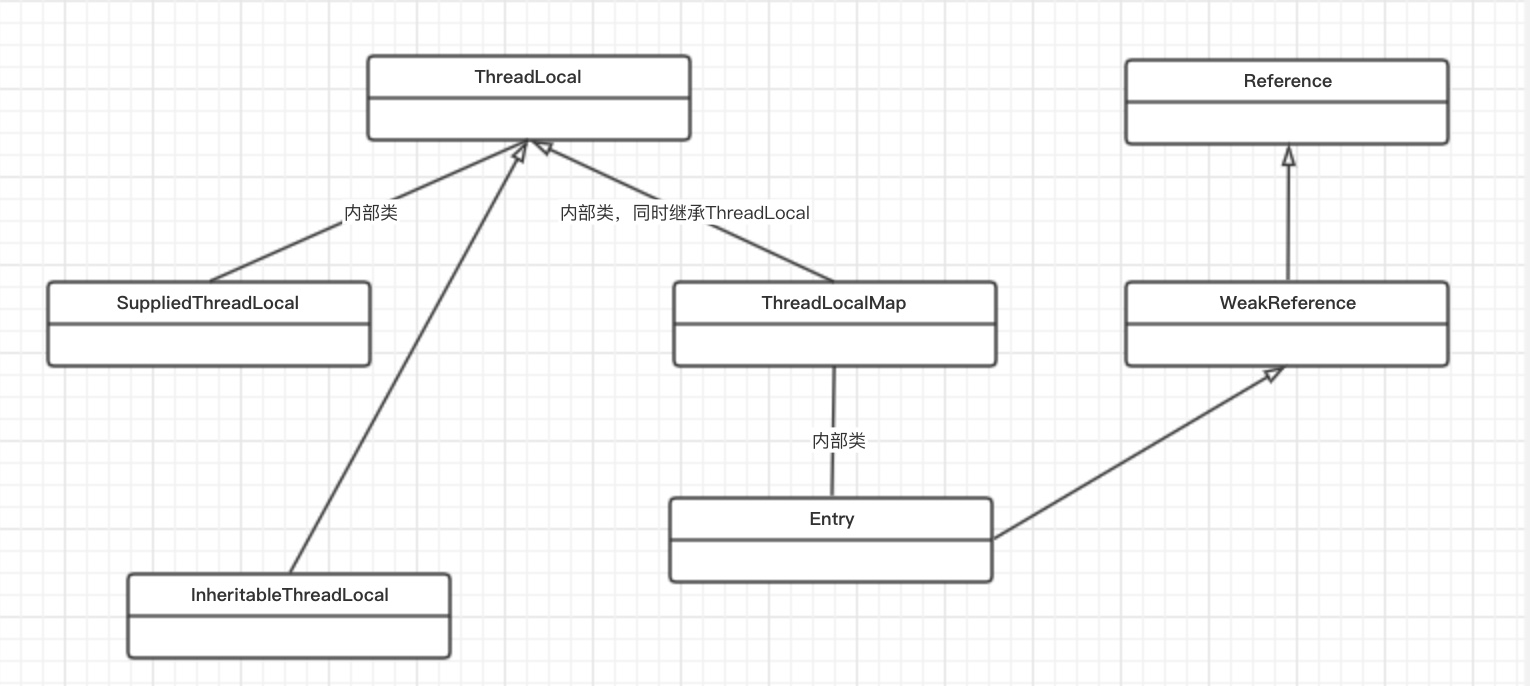
通过类图,我们发现,ThreadLocal的内部,主要是通过一个内部类ThreadLocalMap来实现的。而ThreadLocalMap内部,由定义了一个Entry内部类。同时,在途中我们发现了InheritableThreadLocal。对于这连个类的不同,我们会在下面的文章中逐一进行讲解。下面,我们先来说一下ThreadLocal这个类。
ThreadLocal类
这次讲解的方式和之前的有所不同。因为我不会一上来就贴上所有的源码。这回采用的是,我用到了哪部分源码,就贴哪部分源码。这样的讲解,会有更大的针对性和可读性。
初始化方法
对于ThreadLocal而言,如果我们想要用到,那么我们就需要在我们的线程中去创建一个ThreadLocal。对于ThreadLocal,我们的创建方式主要是已下两种:
    @Test
    public void initOneTest(){
        ThreadLocal<String> threadLocal = new ThreadLocal<>();
        System.out.println("initOneTest result is :" + threadLocal.get());
    }

    @Test
    public void initTwoTest(){
        ThreadLocal<String> threadLocal = ThreadLocal.withInitial(String::new);
        System.out.println("initTwoTest result is :" + threadLocal.get());
    }
此时,我们程序的执行结果如下:
initOneTest result is :null
initTwoTest result is :既然我们的ThreadLocal有两种创建方式,那么这两种方式有什么不同吗?接下来,我们对比下这两种方式
构造函数
    /**
     * Creates a thread local variable.
     * @see #withInitial(java.util.function.Supplier)
     */
    public ThreadLocal() {
}我们看到,对于构造函数而言,JDK的库工程师们并没有帮我们去做任何的事情,就是提供了一个默认的构造函数来供我们调用。同时,对于ThreadLocal内部的成员变量threadLocalHashCode、nextHashCode、HASH_INCREMENT,提供了一个默认的值。
withInitial 方法
    /**
     * Creates a thread local variable. The initial value of the variable is
     * determined by invoking the {@code get} method on the {@code Supplier}.
     *
     * @param <S> the type of the thread local's value
     * @param supplier the supplier to be used to determine the initial value
     * @return a new thread local variable
     * @throws NullPointerException if the specified supplier is null
     * @since 1.8
     */
    public static <S> ThreadLocal<S> withInitial(Supplier<? extends S> supplier) {
        return new SuppliedThreadLocal<>(supplier);
}我们看到,对于withInital方法,ThreadLocal的内部是采用的调用了一个静态内部类SuppliedThreadLocal来实现的。而这个静态类的源码如下:
/**
    * An extension of ThreadLocal that obtains its initial value from
    * the specified {@code Supplier}.
    */
static final class SuppliedThreadLocal<T> extends ThreadLocal<T> {

    private final Supplier<? extends T> supplier;

    SuppliedThreadLocal(Supplier<? extends T> supplier) {
        this.supplier = Objects.requireNonNull(supplier);
    }

    @Override
    protected T initialValue() {
        return supplier.get();
    }
}通过代码我们可以知道,对于SuppliedThreadLocal的构造方法,它接收的是一个Supplier的泛型接口,这个接口是Java8提供的一个函数式接口,因此在这里,我们可以采用lamdba表达式的形式,将我们的参数传递近来,例如上文的String::new。至于具体的,请参考相应的文章。
在这里接口,我们看见,它仅仅只是一个判空的操作和赋值的操作。
get方法
对于get方法,ThreadLocal的源码如下:
  /**
     * Returns the value in the current thread's copy of this
     * thread-local variable.  If the variable has no value for the
     * current thread, it is first initialized to the value returned
     * by an invocation of the {@link #initialValue} method.
     *
     * @return the current thread's value of this thread-local
     */
    public T get() {
        Thread t = Thread.currentThread();
        ThreadLocalMap map = getMap(t);
        if (map != null) {
            ThreadLocalMap.Entry e = map.getEntry(this);
            if (e != null) {
                @SuppressWarnings("unchecked")
                T result = (T)e.value;
                return result;
            }
        }
        return setInitialValue();
}对于官方给定的解释,返回的是以当前线程为Key,然后获取到这个线程下的变量的值,如果在当前线程不存在,则先进行初始化,然后再返回对应的值。
接下来,我们解读下代码,首先通过Thread.currentThread()获取到当前线程。然后通过getMap的方法来获取到对应的ThreadLocalMap中的值。而getMap的方法如下:
    /**
     * Get the map associated with a ThreadLocal. Overridden in
     * InheritableThreadLocal.
     *
     * @param  t the current thread
     * @return the map
     */
    ThreadLocalMap getMap(Thread t) {
        return t.threadLocals;
}通过这段代码,我们发现,对于每个线程,都有一个ThreadLocalMap,而ThreadLocalMap又是ThreadLoal的静态内部类。因此在Thread中,每个线程都会存在一个ThreadLocal.ThreadLocalMap的成员变量。因此,这个就证实了,ThreadLocal是线程间私有的,不存在并发的问题的。同时,我们发现,对于ThreadLocal而言,它的内部存储都是采用一个ThreadLocalMap的方式进行存储的。因此,对于整个ThreadLocal而言,最最重要的就是ThreadLocalMap。
如果当前线程的ThreadLocalMap不为null,则我们获取到map后,会通过ThreadLocalMap.Entry e = map.getEntry(this);的方式去获取Entry。可能到这里,读者会别叫晕,一会是ThreadLocalMap,一会又是ThreadLocal.ThreadLocalMap.Entry的。不要急,在解释完这个方法后,我们会讲解下ThreadLocalMap这个类的。
在获取到Entry后,我们判断当前Entry是否为null,如果不为null,此时我们回去对应的value,将value返回即可。
最后,如果我们发现ThreadLocalMap为null,或者Entry为null,此时会执行setInitialValue方法。这个方法的源码如下:
    /**
     * Variant of set() to establish initialValue. Used instead
     * of set() in case user has overridden the set() method.
     *
     * @return the initial value
     */
    private T setInitialValue() {
        T value = initialValue();
        Thread t = Thread.currentThread();
        ThreadLocalMap map = getMap(t);
        if (map != null)
            map.set(this, value);
        else
            createMap(t, value);
        return value;
}在这个方法中,我们首先会通过initialValue获取到value。而这个方法的源码又分为两部分,如果我们是通过new ThreadLocal<>()方式创建的,此时调用的源码如下:
    protected T initialValue() {
        return null;
}而如果我们是通过ThreadLoacl.withInitial方法创建的,那么此时调用的就是
@Override
protected T initialValue() {
    return supplier.get();
}而这里面的supplier就是我们上面将的第二种初始化的时候,传进来的lamdba表达式。
同样的,我们继续获取当前线程。然后再次调用getMap方法,如果我们发现map存在,则只需要将value添加到map中即可。如果map不存在,则调用createMap方法。
    /**
     * Create the map associated with a ThreadLocal. Overridden in
     * InheritableThreadLocal.
     *
     * @param t the current thread
     * @param firstValue value for the initial entry of the map
     */
    void createMap(Thread t, T firstValue) {
        t.threadLocals = new ThreadLocalMap(this, firstValue);
}而创建Map的过程,就是对线程的threadLocals进行赋值,而创建值的过程就是调用ThreadLocalMap的一个构造方法。
    void createMap(Thread t, T firstValue) {
        t.threadLocals = new ThreadLocalMap(this, firstValue);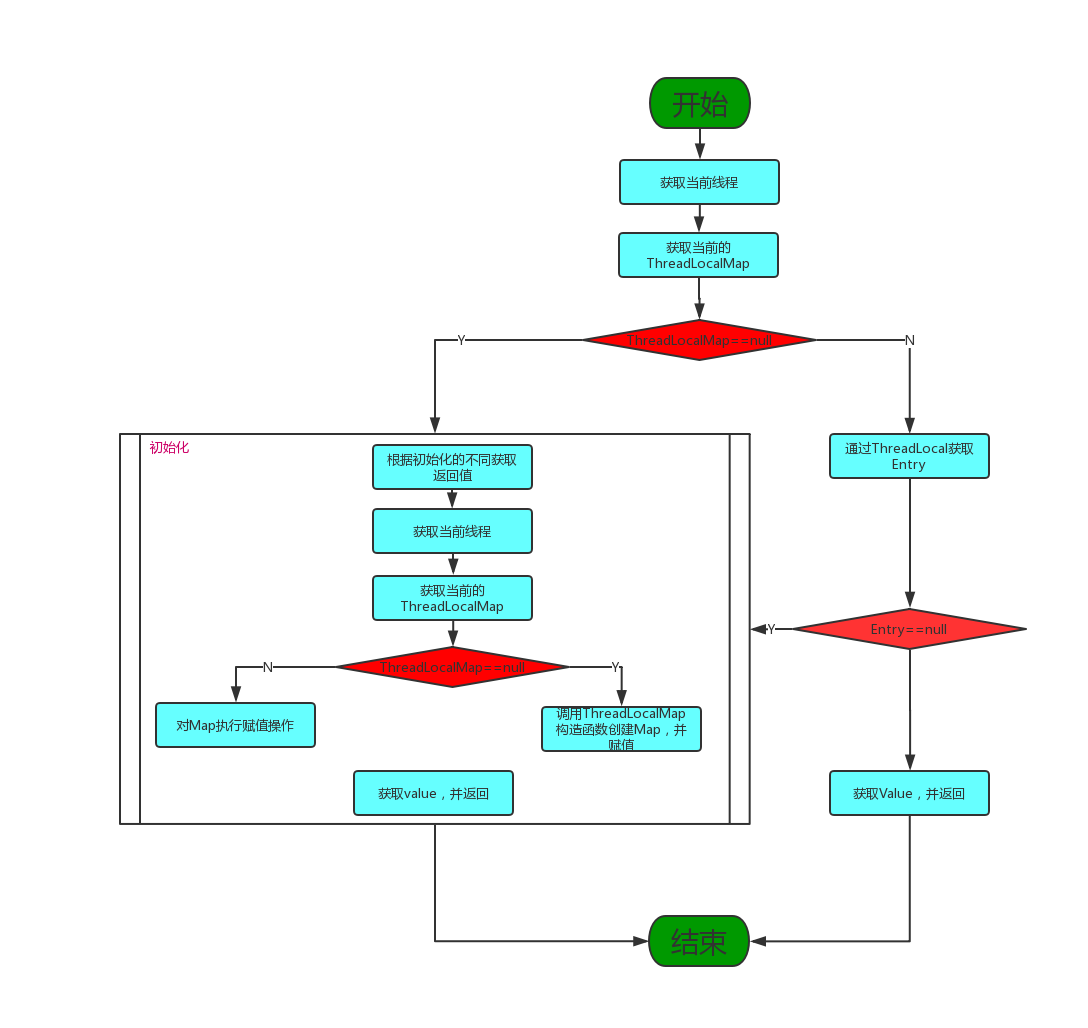
}整个get方法的调用流程图如下:
ThreadLocalMap内部类
在刚刚进行讲解的时候,我们发现,其实在ThreadLocal的内部,其实是用ThreadLocalMap进行存储的。因此为了理解ThreadLocal,ThreadLocalMap就显得十分的重要。那么既然要好好的理解ThreadLocalMap,那么我们首先要看看他的源码:
构造方法
根据之前的时候,我们首先要看下ThreadLocalMap的构造方法:
/**
    * Construct a new map initially containing (firstKey, firstValue).
    * ThreadLocalMaps are constructed lazily, so we only create
    * one when we have at least one entry to put in it.
    */
ThreadLocalMap(ThreadLocal<?> firstKey, Object firstValue) {
    table = new Entry[INITIAL_CAPACITY];
    int i = firstKey.threadLocalHashCode & (INITIAL_CAPACITY - 1);
    table[i] = new Entry(firstKey, firstValue);
    size = 1;
    setThreshold(INITIAL_CAPACITY);
}

/**
    * Construct a new map including all Inheritable ThreadLocals
    * from given parent map. Called only by createInheritedMap.
    *
    * @param parentMap the map associated with parent thread.
    */
private ThreadLocalMap(ThreadLocalMap parentMap) {
    Entry[] parentTable = parentMap.table;
    int len = parentTable.length;
    setThreshold(len);
    table = new Entry[len];

    for (int j = 0; j < len; j++) {
        Entry e = parentTable[j];
        if (e != null) {
            @SuppressWarnings("unchecked")
            ThreadLocal<Object> key = (ThreadLocal<Object>) e.get();
            if (key != null) {
                Object value = key.childValue(e.value);
                Entry c = new Entry(key, value);
                int h = key.threadLocalHashCode & (len - 1);
                while (table[h] != null)
                    h = nextIndex(h, len);
                table[h] = c;
                size++;
            }
        }
    }
}我们先来看看第一个构造函数,通过上面的注释,我们可以知道,ThreadLocalMap是进行延迟构建的。也就是说它并不会在创建一个线程的时候,就会初始化ThreadLocalMap。而是在我们第一次需要从里面拿值的话,才会进行调用的。因为ThreadLocalMap并没有提供默认的构造函数,因此想要调用的时候,必须要有一个默认的值。
通过代码我们可以知道,程序首先会创建一个Entry数组,而Entry的定义是什么呢?
/**
* The entries in this hash map extend WeakReference, using
* its main ref field as the key (which is always a
* ThreadLocal object).  Note that null keys (i.e. entry.get()
* == null) mean that the key is no longer referenced, so the
* entry can be expunged from table.  Such entries are referred to
* as "stale entries" in the code that follows.
*/
static class Entry extends WeakReference<ThreadLocal<?>> {
    /** The value associated with this ThreadLocal. */
    Object value;

    Entry(ThreadLocal<?> k, Object v) {
        super(k);
        value = v;
    }
}因为在ThreadLocalMap中,每一个线程和对应的私有的变量,都是一对一对的。采用的是K-V模式。因此,我们可以将这样的映射关系封装成一个Entry。这里采用的是JDK中Map的思想,因为ThreadLocalMap本身也是一种Map数据结构,通过hash去进行结算的。并且,对于Key的采用,是对ThreadLocal采用的一种弱引用的方式进行引用的。因此,我们发现,真正的将线程与变量之间连接起来的,是通过Entry进行封装的。而Entry又是存储在ThreadLocal中的。因此,Entry仅仅只是一个POJO,它仅仅给我们提供了一个构造函数而已。
接下来,我们继续分析第一个构造函数的代码,首先是创建了一个Entry的数组,并且数组默认的大小是16。这个大小与HashMap的默认容量是一致的。接下来,我们根据ThreadLocal这个Key的hash code与INITIAL_CAPACITY - 1进行与运算,之所以这样,是因为默认情况下,数组的大小是INITIAL_CAPACITY,又因为数组是从0开始的,因此数组的下标范围是[0,INITIAL_CAPACITY-1]。而我们通过代码可以发现,在ThreadLocal中有一个神奇的数字0x61c88647。这个数字的目的是为了实现让多个ThreadLocal中可以实现让hash code均匀的分布在2的n次方中,同时,如果发生了碰撞,此时还可以利用了开放定址法来解决碰撞的问题。
在上面的代码中,当我们获取到数组下边后,通过创建一个Entry来放到数组中,同时设置数组的使用度size为1。同时设置Map的阈值为16*2/3为10。当数组中的使用度size大于10的时候,将进行扩容。
接下来,我们看下第二个构造函数。第二个构造函数的目的是当我们已经有一个ThreadLocalMap的时候,来创建另外一个ThreadLocalMap时进行调用。这个构造函数的调用仅会被InheritableThreadLocal调用。此时我们会在讲解InheritableThreadLocal时进行讲解。
resize方法
当ThreadLocalMap中的Entry数组超过阈值之后,此时会对Entry数组进行扩容,扩容的代码如下:
/**
* Double the capacity of the table.
*/
private void resize() {
    Entry[] oldTab = table;
    int oldLen = oldTab.length;
    int newLen = oldLen * 2;
    Entry[] newTab = new Entry[newLen];
    int count = 0;

    for (int j = 0; j < oldLen; ++j) {
        Entry e = oldTab[j];
        if (e != null) {
            ThreadLocal<?> k = e.get();
            if (k == null) {
                e.value = null; // Help the GC
            } else {
                int h = k.threadLocalHashCode & (newLen - 1);
                while (newTab[h] != null)
                    h = nextIndex(h, newLen);
                newTab[h] = e;
                count++;
            }
        }
    }

    setThreshold(newLen);
    size = count;
    table = newTab;
}我们来看下,JDK的库工程师是如何对数组进行高效扩容的。首先会去创建一个有原来两倍大小的新Entry数组,然后遍历老数组,获取老数组中每个数组的元素。如果元素不为空,则判断当前元素的ThreadLocal是否还在被引用,如果没有,则直接将value设置为null,帮助GC清理。否则的话,将会根据int h = k.threadLocalHashCode & (newLen - 1);的值,同时根据线性开放定址法来元素应该在数组中的真正下标,然后将元素放入到数组中。最后设置新的数组的阈值和使用度size。
rehash方法
在上面,我们讲解了resize方法,其实,resize方法是被rehash方法调用的。我们发现在set方法中,有如下的源码:
if (!cleanSomeSlots(i, sz) && sz >= threshold)
rehash();我们发现,如果在set方法触发了某些条件后,将会执行rehash方法。至于具体的条件的原因,会在接下来的set方法讲解的时候进行说明。
既然知道了是从何处进行调用的,那么我们就来看下rehash的源码:
    /**
    * Re-pack and/or re-size the table. First scan the entire
    * table removing stale entries. If this doesn't sufficiently
    * shrink the size of the table, double the table size.
    */
private void rehash() {
    expungeStaleEntries();

    // Use lower threshold for doubling to avoid hysteresis
    if (size >= threshold - threshold / 4)
        resize();
}通过源码,我们可以发现,此时回去调用expungeStaleEntries方法。在调用后,如果size依然大于threshold - threshold / 4。此时会执行resize方法。因此,在这个方法中,expungeStaleEntries是重点。
    /**
    * Expunge all stale entries in the table.
    */
    private void expungeStaleEntries() {
        Entry[] tab = table;
        int len = tab.length;
        for (int j = 0; j < len; j++) {
            Entry e = tab[j];
            if (e != null && e.get() == null)
                expungeStaleEntry(j);
        }
}通过这个代码的注释,我们发现,这个方法的目的是为了实现将Entry数组中无效信息清除掉。具体是怎么做的呢?其实很简单,就是遍历数组中的每个元素,如果发现当前Entry有值,但是没有任何引用,则直接调用expungeStaleEntry方法。
/**
* Expunge a stale entry by rehashing any possibly colliding entries
* lying between staleSlot and the next null slot.  This also expunges
* any other stale entries encountered before the trailing null.  See
* Knuth, Section 6.4
*
* @param staleSlot index of slot known to have null key
* @return the index of the next null slot after staleSlot
* (all between staleSlot and this slot will have been checked
* for expunging).
*/
private int expungeStaleEntry(int staleSlot) {
    Entry[] tab = table;
    int len = tab.length;

    // expunge entry at staleSlot
    tab[staleSlot].value = null;
    tab[staleSlot] = null;
    size--;

    // Rehash until we encounter null
    Entry e;
    int i;
    for (i = nextIndex(staleSlot, len);
            (e = tab[i]) != null;
            i = nextIndex(i, len)) {
        ThreadLocal<?> k = e.get();
        if (k == null) {
            e.value = null;
            tab[i] = null;
            size--;
        } else {
            int h = k.threadLocalHashCode & (len - 1);
            if (h != i) {
                tab[i] = null;

                // Unlike Knuth 6.4 Algorithm R, we must scan until
                // null because multiple entries could have been stale.
                while (tab[h] != null)
                    h = nextIndex(h, len);
                tab[h] = e;
            }
        }
    }
    return i;
}这段代码有点绕,接下来,我们通过一张图的方式来进行讲解,在接下来的解释中,我们会用到线性嗅探的开放定址法。
加入我们下载有9个线程,他们的threadLocalHashCode分别问[47,7,29,11,9,84,54,20,30]。我们的Entry数组的大小为16。
接下来,我们看下,他们默认的在数组中的位置:

我们假设在index为4的时候,此时的ThreadLocal为null,则触发expungeStaleEntry操作。此时我们会将tab[4]的value设置为null。同时,tab[4]=null。然后我们从index=5的时候开始算,此时i=5。
- 判断
tab[5]为否为null。如果为null,结束流程,否则执行下一步 - 判断
tab[5]是否存在ThreadLocal。如果不存在,则将tab[5]的value设置为null,同时tab[5]=null、size减一;如果存在这行下一步 - 如果存在
ThreadLocal,则判断当前值应当在数组中的位置是否是当前位置,如果不是,也就是发生过线性嗅探,则将当前节点这是为null。然后从应该存在的位置从新进行线性嗅探。
因此,对于i=5而言,首先会将tab[5]=null,然后从index=4处开始线性嗅探,此时发现table[5]为null,然后将20重新插入到tab[5]中。接下来以此类推。最终的结果是:

set方法
在上面,我们讲解了ThreadLocal的get方法。接下来,我们讲解下ThreadLocal的set方法。
/**
* Sets the current thread's copy of this thread-local variable
* to the specified value.  Most subclasses will have no need to
* override this method, relying solely on the {@link #initialValue}
* method to set the values of thread-locals.
*
* @param value the value to be stored in the current thread's copy of
*        this thread-local.
*/
public void set(T value) {
    Thread t = Thread.currentThread();
    ThreadLocalMap map = getMap(t);
    if (map != null)
        map.set(this, value);
    else
        createMap(t, value);
}对于set方法十分的简单,就是查询一下,当前map是否存在如果如在,直接执行put方法。如果不存在,则执行上面讲解的createMap方法。这里有一点要注意一下,如果我们在创建了ThreadLocal后先执行了set方法,则在get的时候,就直接过去,不会在执行get里面的setInitialValue方法了。
remove方法
对于remove方法,则十分的简单
/**
* Removes the current thread's value for this thread-local
* variable.  If this thread-local variable is subsequently
* {@linkplain #get read} by the current thread, its value will be
* reinitialized by invoking its {@link #initialValue} method,
* unless its value is {@linkplain #set set} by the current thread
* in the interim.  This may result in multiple invocations of the
* {@code initialValue} method in the current thread.
*
* @since 1.5
*/
public void remove() {
    ThreadLocalMap m = getMap(Thread.currentThread());
    if (m != null)
        m.remove(this);
}对于remove方法,则直接调用map的remove方法。删除当前的Entry即可。
InheritableThreadLocal类
在上面的代码中,我们讲解了ThreadLocal。其实在JDK中,还有一个类似ThreadLocal的存在,那就是InheritableThreadLocal。它与ThreadLocal不同的是,ThreadLocal仅仅只在当前线程有效,在子线程中是无效的。而InheritableThreadLocal是可以继承当前父线程中的InheritableThreadLocal的值。
ThreadLocal与InheritableThreadLocal的使用方式都是相同的。在接下来的讲解中,我们会进行举例说明。
在讲解InheritableThreadLocal的时候,我不会采用全量的方式进行讲解,只有发现与ThreadLocal不同的地方,才会进行重点讲解。
初始化
InheritableThreadLocal的初始化方法与ThreadLocal是有很大的不同的。因为对于ThreadLocal而言,它的变量定义是在Thread中,而初始化是通过ThreadLocal的构造函数,或者是SuppliedThreadLocal的构造函数完成的。
而InheritableThreadLocal的定义依然是在Thread中的,因此他与ThreadLocal是一样的,都是线程私有的。但是他的初始化方法,除了InheritableThreadLocal构造方法。更更重要的是在Thread的init方法进行初始化的。接下来,我们看下代码:
if (inheritThreadLocals && parent.inheritableThreadLocals != null)
    this.inheritableThreadLocals =
ThreadLocal.createInheritedMap(parent.inheritableThreadLocals);这段代码是init方法中的部分代码,其中,我们不管inheritThreadLocals变量,因为他默认是true。我们主要关心的是&&之后的判断,在这里,他会判断当前线程的父线程的inheritableThreadLocals是否为null,如果不为null,则会调用ThreadLocal的createInheritedMap方法。而createInheritedMap的源码如下:
/**
* Factory method to create map of inherited thread locals.
* Designed to be called only from Thread constructor.
*
* @param  parentMap the map associated with parent thread
* @return a map containing the parent's inheritable bindings
*/
static ThreadLocalMap createInheritedMap(ThreadLocalMap parentMap) {
    return new ThreadLocalMap(parentMap);
}此时我们发现,它调用的是ThreadLocal的第二个构造函数,也就是我们在上面没有进行讲解的那个构造函数。为了方便理解,我们再贴一下第二个构造函数的源码:
/**
* Construct a new map including all Inheritable ThreadLocals
* from given parent map. Called only by createInheritedMap.
*
* @param parentMap the map associated with parent thread.
*/
private ThreadLocalMap(ThreadLocalMap parentMap) {
    Entry[] parentTable = parentMap.table;
    int len = parentTable.length;
    setThreshold(len);
    table = new Entry[len];

    for (int j = 0; j < len; j++) {
        Entry e = parentTable[j];
        if (e != null) {
            @SuppressWarnings("unchecked")
            ThreadLocal<Object> key = (ThreadLocal<Object>) e.get();
            if (key != null) {
                Object value = key.childValue(e.value);
                Entry c = new Entry(key, value);
                int h = key.threadLocalHashCode & (len - 1);
                while (table[h] != null)
                    h = nextIndex(h, len);
                table[h] = c;
                size++;
            }
        }
    }
}在这个方法中,就是通过获取父线程的parentMap.table的值,然后添加到子线程中去,如果发生了碰撞,则通过线性嗅探的开放定址法来确定最终的index,然后添加到子线程的map中去。在这里,我们要注意一个方法childValue。
/**
* Computes the child's initial value for this inheritable thread-local
* variable as a function of the parent's value at the time the child
* thread is created.  This method is called from within the parent
* thread before the child is started.
* <p>
* This method merely returns its input argument, and should be overridden
* if a different behavior is desired.
*
* @param parentValue the parent thread's value
* @return the child thread's initial value
*/
protected T childValue(T parentValue) {
    return parentValue;
}我们发现,这个方法仅仅只是保留的方法。如果需要,我们可以通过集成来实现自己的逻辑。同时,需要注意一下,如果往InheritableThreadLocal放的是一个引用类型,例如Map等。此时会出现父类和子类公用一个Map的问题。如果有这方面的需要,我们需要去集成这个类,重写childValue方法。
使用案例
import java.util.HashMap;
import java.util.Map;

public class ThreadLocalTest {

    private static final ThreadLocal<String> threadLocal = new ThreadLocal<>();
    private static final InheritableThreadLocal<String> inheritableThreadLocal = new InheritableThreadLocal<>();

    static void getThreadLocal(){
        System.out.println(Thread.currentThread().getName() + "--->threadLocal--->"+threadLocal.get());
        System.out.println(Thread.currentThread().getName() + "--->inheritableThreadLocal--->"+inheritableThreadLocal.get());
    }


    public static void main(String[] args) throws InterruptedException {
        threadLocal.set("shen1");
        inheritableThreadLocal.set("gou1");
        getThreadLocal();
        Thread thread = new Thread1();
        thread.setName("thread1");
        thread.start();

        Thread.sleep(6000);
        getThreadLocal();
    }

    static class Thread1 extends Thread{

        @Override
        public void run() {
            super.run();
            getThreadLocal();
            threadLocal.set("shen2");
            inheritableThreadLocal.set("gou2");
            Thread thread = new Thread2();
            thread.setName("thread2");
            thread.start();
            getThreadLocal();
        }
    }

    static class Thread2 extends Thread{

        @Override
        public void run() {
            super.run();
            getThreadLocal();
            threadLocal.set("shen3");
            inheritableThreadLocal.set("gou3");
            getThreadLocal();
        }
    }
}
程序结果运行如下:
main--->threadLocal--->shen1
main--->inheritableThreadLocal--->gou1
thread1--->threadLocal--->null
thread1--->inheritableThreadLocal--->gou1
thread1--->threadLocal--->shen2
thread1--->inheritableThreadLocal--->gou2
thread2--->threadLocal--->null
thread2--->inheritableThreadLocal--->gou2
thread2--->threadLocal--->shen3
thread2--->inheritableThreadLocal--->gou3
main--->threadLocal--->shen1
main--->inheritableThreadLocal--->gou1
模拟ThreadLocal内存泄漏的案例
在上面的文章中,我们发现,ThreadLocal其实是弱引用。并且网上总是说,如果使用不当,会造成内存泄露的问题。因此我们现在测试一下:
package com.gouqiang.shen.threadlocal;

import java.util.concurrent.ExecutorService;
import java.util.concurrent.Executors;

public class TestOne {

    /**
     * 校验内存泄露
     */
    public static void testThreadLocalMemoryLeak(){
        ExecutorService service = Executors.newSingleThreadExecutor();
        ThreadLocal<String> threadLocal = new ThreadLocal<>();
        for (int i = 0; i < 10; i++) {
            if(i == 0){
                service.execute(new Runnable() {
                    @Override
                    public void run() {
                        System.out.println("Thread id is " + Thread.currentThread().getId());
                        threadLocal.set("variable");
                    }
                });
            } else if(i > 0){
                service.execute(new Runnable() {
                    @Override
                    public void run() {
                        if("variable".equals(threadLocal.get())){
                            System.out.println("Thread id " + Thread.currentThread().getId() + " got it !");
                        }
                    }
                });
            }
        }
        service.shutdown();
    }

    public static void main(String[] args) {
        testThreadLocalMemoryLeak();
    }
}
运行结果如下
Thread id is 12
Thread id 12 got it !
Thread id 12 got it !
Thread id 12 got it !
Thread id 12 got it !
Thread id 12 got it !
Thread id 12 got it !
Thread id 12 got it !
Thread id 12 got it !
Thread id 12 got it !我们发现,在不使用线程池的前提下,即使不调用remove方法,线程的”变量副本”也会被gc回收,即不会造成内存泄漏的情况。但是如果使用线程池的情况下,因为线程使用完毕,不是被销毁,而是被还给线程池,当我们下次使用的时候,就会获取上次线程池的值。因此,就会发生内存泄露的问题。如果我们放的是一个Map,而不是一个String的话,随着put的次数越来越多,Map中的内容越来越大。极有可能会导致内存溢出的。
总结
花了两天的时间,总结了下ThreadLocal的底层源码,对于Hash的理解也更加的深刻。同时对于为什么ThreadLocal是线程私有化的也有了更加深刻的理解。在以后的开发与使用中,会有更大的收益。
转载请注明来源,欢迎指出任何有错误或不够清晰的表达。可以邮件至 gouqiangshen@126.com
文章标题:JDK学习--ThreadLocal
文章字数:6.1k
本文作者:BiggerShen
发布时间:2019-11-14, 22:40:24
最后更新:2024-01-16, 03:51:15
原始链接:https://shengouqiang.cn/Java/JDK/Thread/JavaLearnDay01/版权声明: 转载请保留原文链接及作者。

